Customer Splitter
Customer Splitter (CS) is a CRM module, which purpose is to automate and optimize the assignment of customers to agents.
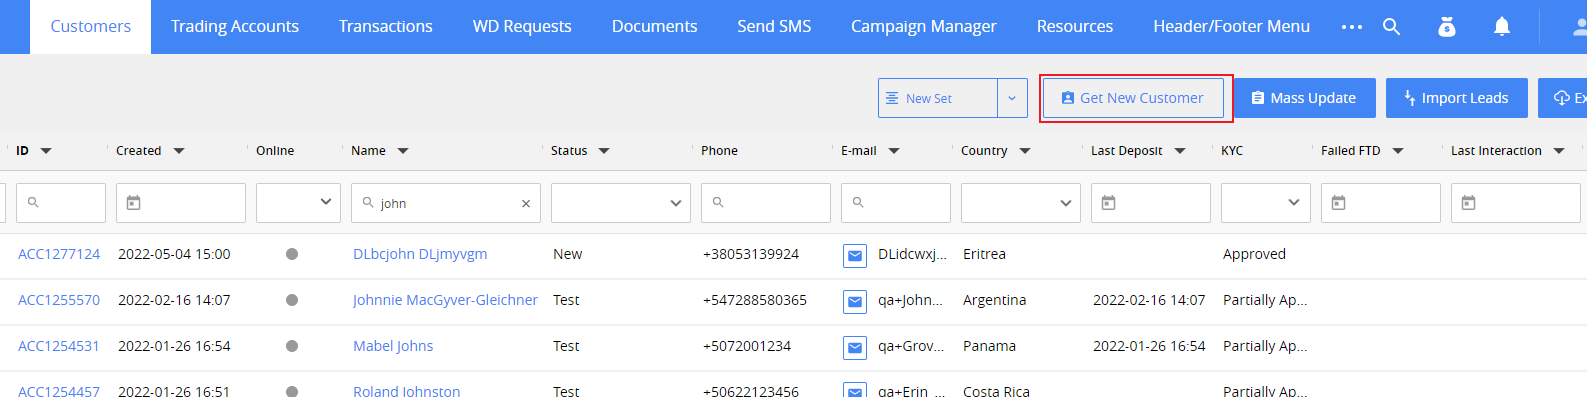
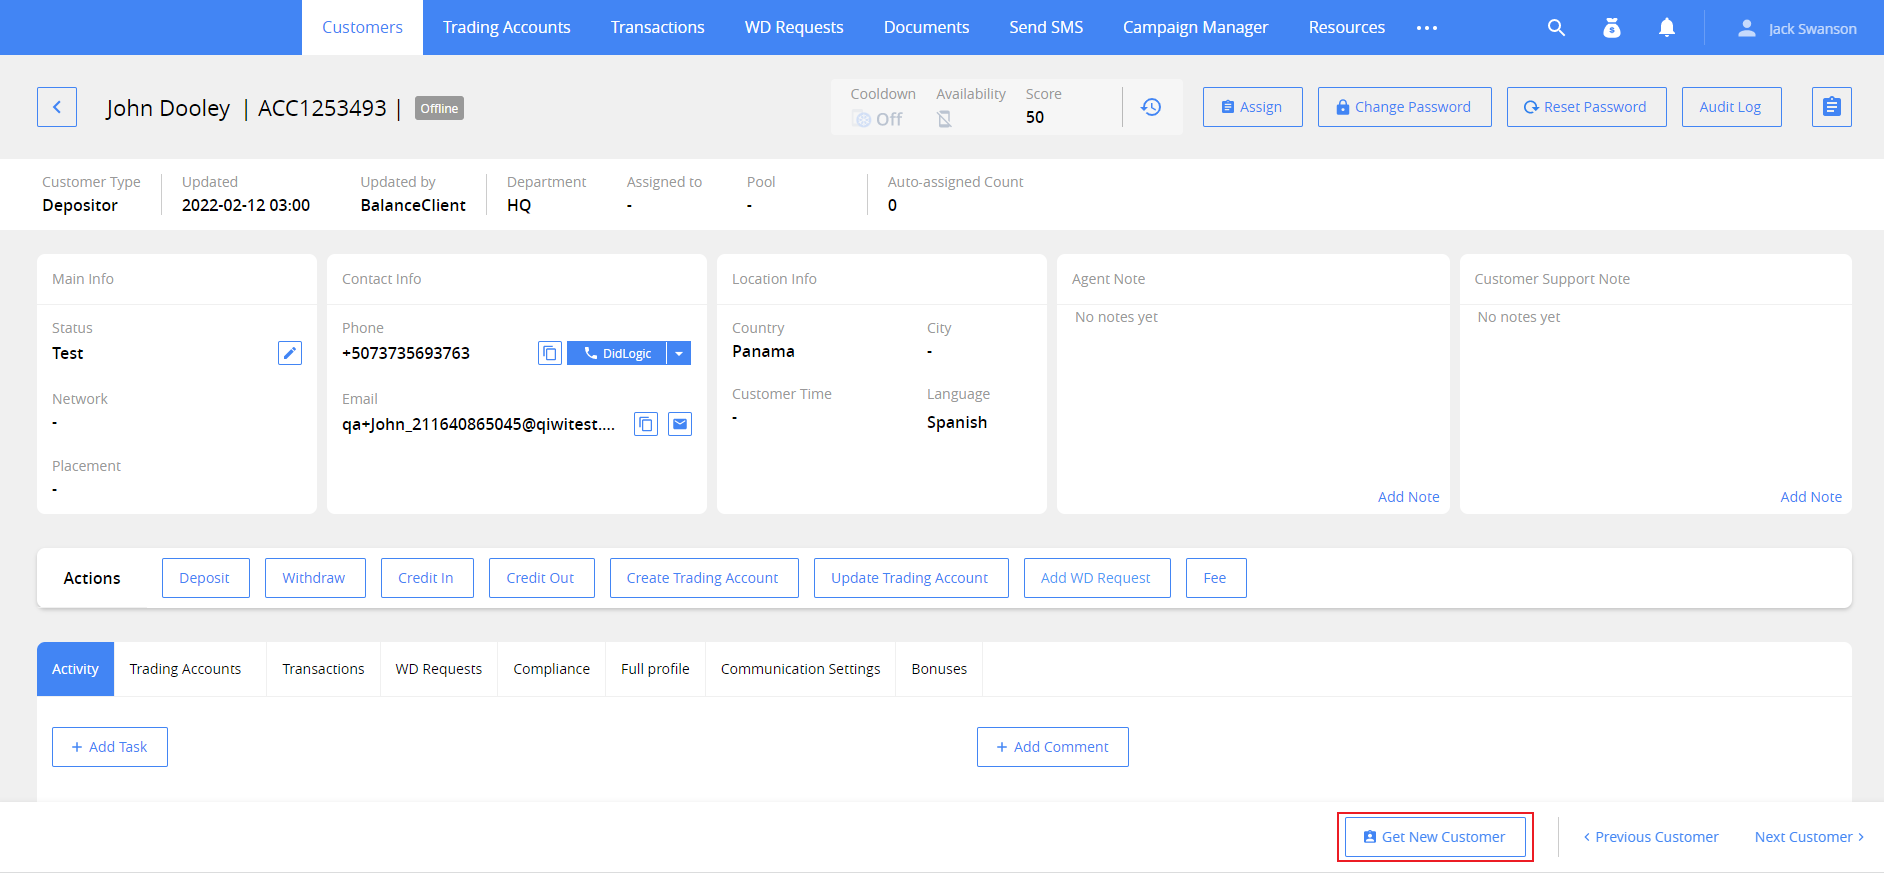
To use CS functionality, click the Get New customer button in Customers tab or at the bottom bar in Customer card.
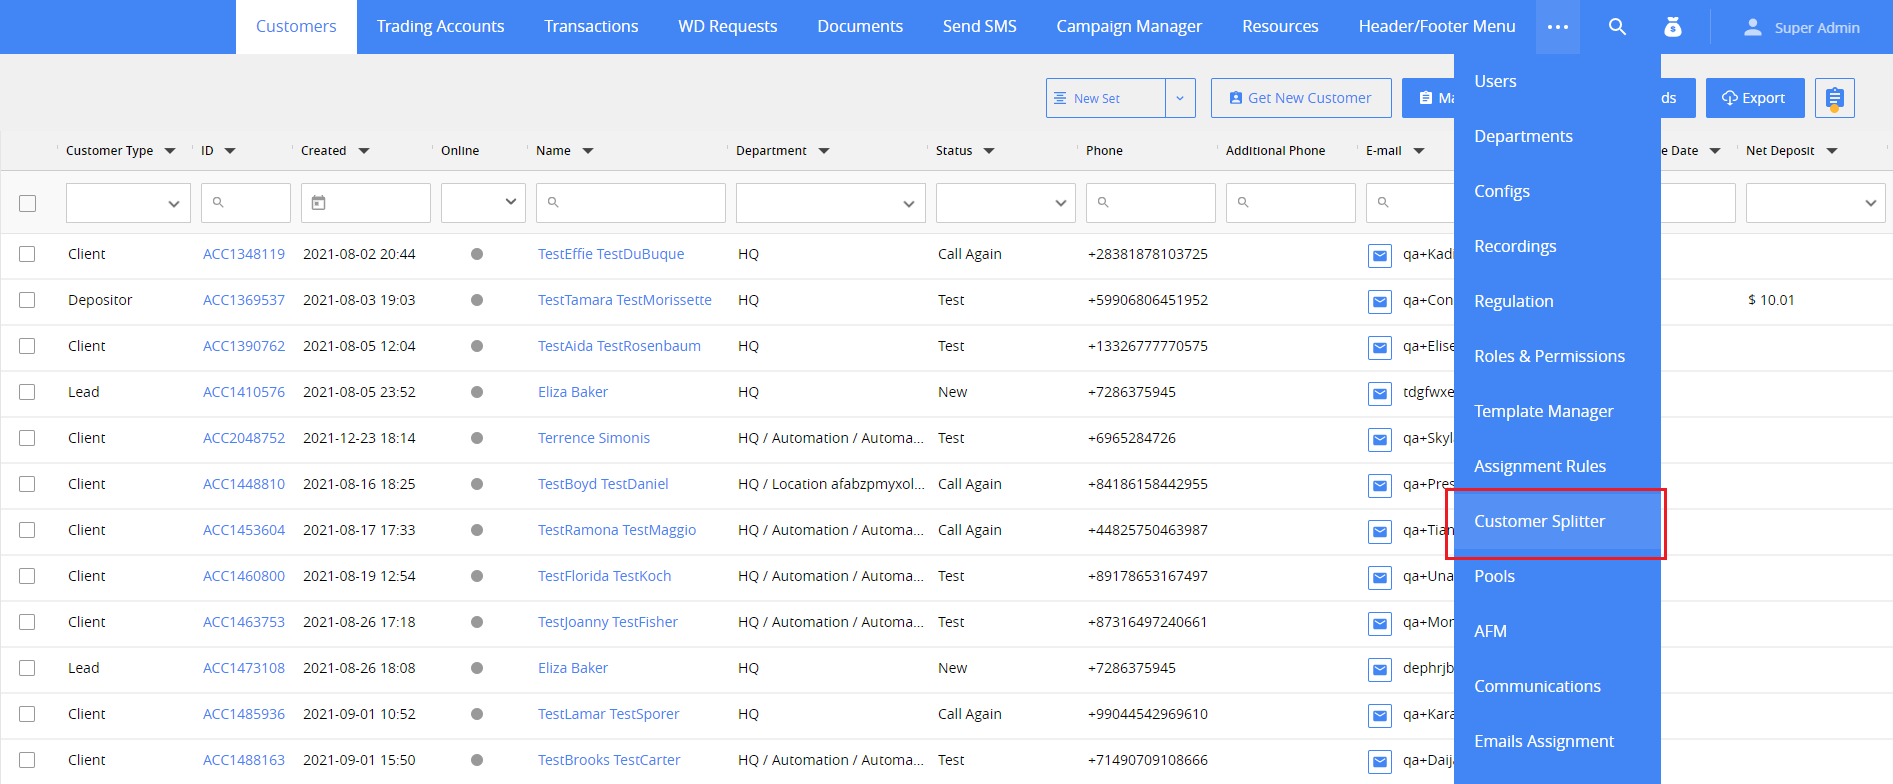
To view and edit CS settings, go to the Customer Splitter tab. To open it, click Customer Splitter in the tab bar. If it doesn’t fit the tab bar, click on the button with three dots, and select it from the menu.
Permissions. Lead Splitter > Manage Customer Splitter.
Customer Splitter settings
CS settings are grouped into subtabs, which you can see at the top of the main tab. Select the subtab you need to edit the settings for. For more information on the settings of each subtab, see the topic with its name below.
Limits
On this tab, you can set the limit values used in CS functionality.
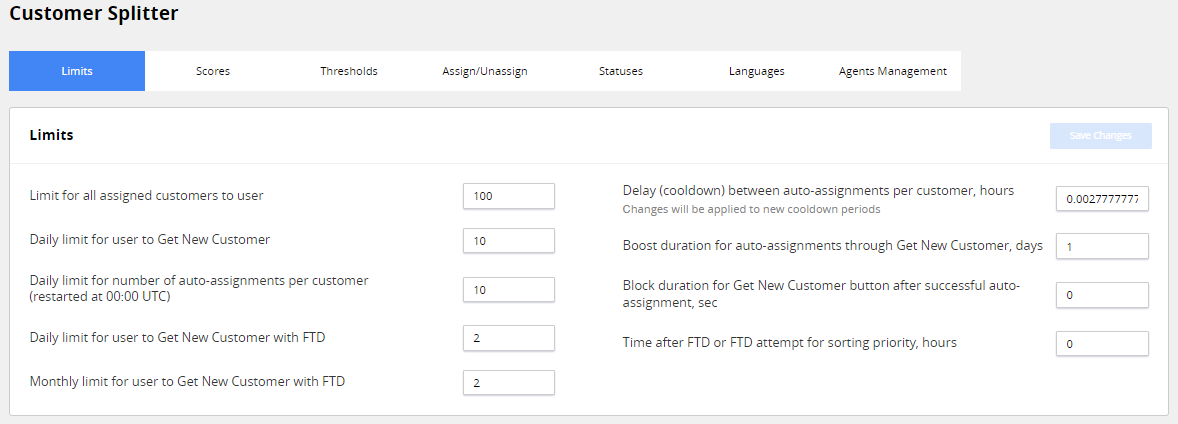
Limit for all assigned customers to user — specifies the maximum number of customers, which can be simultaneously assigned to one agent.
Daily limit for user to Get New Customer — specifies the maximum number of times an agent can click on “Get New Customer” button, within one calendar day.
Daily limit for number of auto-assignments per customer — specifies the maximum number of users, which can be set as assigned to agent within a calendar day. The limit resets at 00:00 UTC.
Daily limit for user to Get New Customer with FTD — specifies the maximum number of customers with full-time deposit (FTD), which can be set as assigned to one agent within a calendar day. The limit resets at 00:00 UTC.
Monthly limit for user to Get New Customer with FTD — specifies the maximum number of customers with FTD, which can be set as assigned to one agent within a calendar month. The limit resets on the first day of the next month.
Delay (cooldown) between auto-assignments per customer, hours — sets the time for which the customer, who has been automatically unassigned, is not available for agents through “Get New Customer” button. Resets at 00:00 UTC.
Boost duration for auto-assignments through Get New Customer, days — sets for how long Boost attribute is applied to customer**.**
Block duration for Get New Customer button after successful auto-assignment, sec — sets for how long the agent can’t assign new customers for themselves after the successful auto-assignment.
Time after FTD or FTD attempt for sorting priority, hours — sets the time passed after FTD or FTD attempt for the customer, after which they are sorted from oldest to newest, when assigned to agents.
Scores
On this tab, you can set scores for customers and agents, both global and specific to campaign, sub-campaign, country, and other options available for the scores feature.
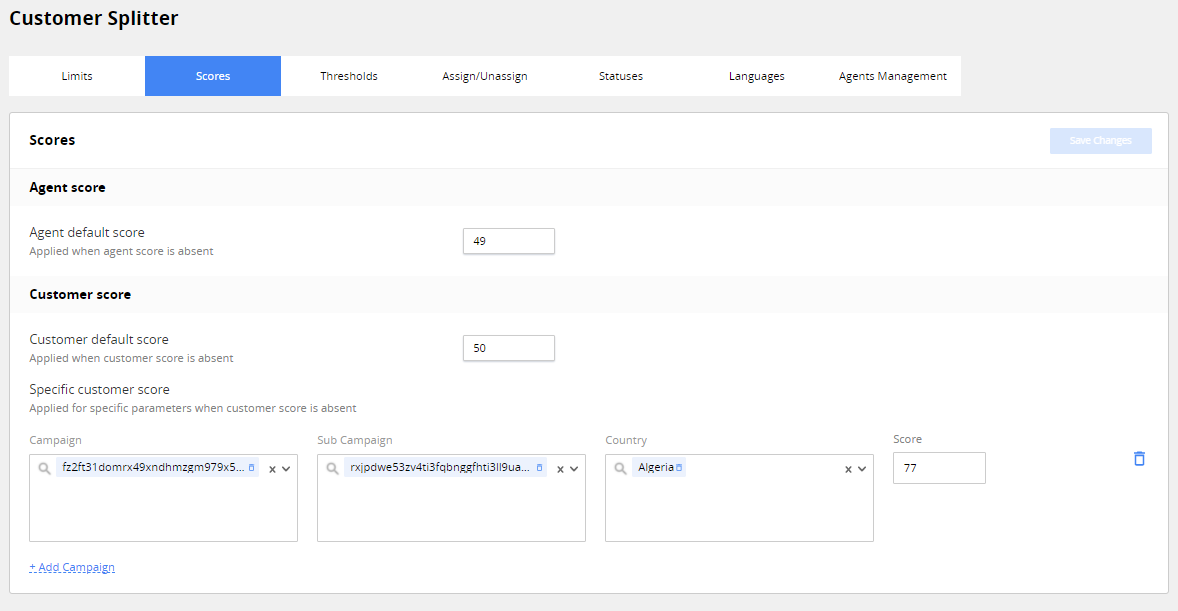
Agent default score. The score value applied to agent if no value is assigned to them for country and campaign from BI.
Customer default score. The score value is applied to customer if there is no value for them from BI. If you update the value, the new value will be applied only to the new customers.
Specific customer score. The values of specific customer scores for customers by country, campaign and sub-campaign.
Thresholds
Threshold is one of the key concepts in CS logic. It is a number value CS uses to compare scores to.
If the score value is equal or higher than threshold value, CS considers this score as high. If the score value is less than threshold value, CS considers this score as low.
Thresholds for customers and agents are independent from each other and are set up separately.
On Thresholds tab, you can set global and individual score thresholds for customers and agents.
Thresholds tab settings are divided into two areas.
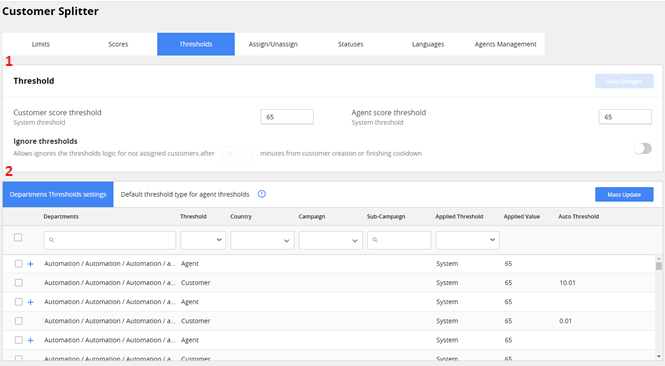
The first block consists of the following elements:
Customer score threshold. The default score threshold value set for customers (0-100).
Agent score threshold. The default score threshold value set for agents (0-100).
Ignore thresholds. The time, after which CS ignores the threshold logic and allows agents with all scores to get customers with all scores. Toggle between the options by using the switch on the right.
The second block of “Thresholds” settings consists of the following elements:
Department Thresholds settings tab.
On this tab, you can edit individual threshold settings for agent desks and the customers assigned to the desk.
You can see the list of desks and customers assigned to desks under the tab. Click the + button on the left of the agent desk to view the list of Individual agents within the desk. The list has the following columns for each entry:
Departments. 4 level structure (Root/Location/Language/Sales Unit) of the department. Move your cursor over a specific department to see its full name. You can edit the list of departments in “Departments ” tab.
Threshold. The type of a score threshold applied to the record. Can be Agent in case the record is the agent department, or Customer in case the record is the customer assigned to the department with the same name.
Country. The country where the threshold is set for the department.
Campaign. The campaign where the threshold is set for the department.
Sub-Campaign. The sub-campaign where the threshold is set for the department.
Applied Threshold. The type of threshold, currently active for the department. It can be:
- System. The threshold from the section 1 above is applied to the department. Customer Score Threshold value is only applied for departments with Type:Customer, Agent Score Threshold value is only applied for departments with Type:Agent.
- Automatic. The threshold from BI is applied to the department.
- Manual. The threshold from Mass Update is applied to the department**.**
Applied Value. The value of the threshold applied to the record.
Auto Threshold. The value of the threshold which BI has provided for this record. You can choose if you want to apply it to the record.
You can sort and filter the list to narrow it down according to your needs.
To mass update thresholds, click Mass Update button on the left.
![]()
The Mass Update window will appear, with the possibility to select the thresholds to update.

You can select the following departments to apply the updates to:
Selected with checkbox. This will apply the updates only to the agents, that were selected on the Departments Thresholds settings list before clicking the Mass Update button.
From all pages. This will apply the updates to all departments.
From the first N thresholds in the list.
You can update the thresholds in the selection with the following values:
Automatic. The values provided by BI will be applied to selection.
System. The values from Customer score threshold and Customer score threshold from the first block will be applied to selection.
Manual. Separate values for customers and agents.
To apply the new values to selection, click the Update button.
- Default threshold type for agent threshold tab. On this tab, you can set the type of threshold, which will be applied to all the new teams in the desk.

The list has the following columns for each entry:
Departments. 4 level structure (Root/Location/Language/Sales Unit) of agent department.
Type. The type of default threshold applied for the departments. Can be System or Automatic.
To search the list, type in the search box under the Department column header, and filter it by choosing the options from the drop-down under the Type column header.
To change the default threshold for the department:
- Click the Edit button on the right side of entry’s row in the list.
- Choose the type of default threshold from the drop-down on entry’s row under the Type column header.
**
**
Assign/Unassign
On this tab, you can set assignment and unassignment rules for customers.
Permissions. Lead Splitter > Manage Assignment Rules.
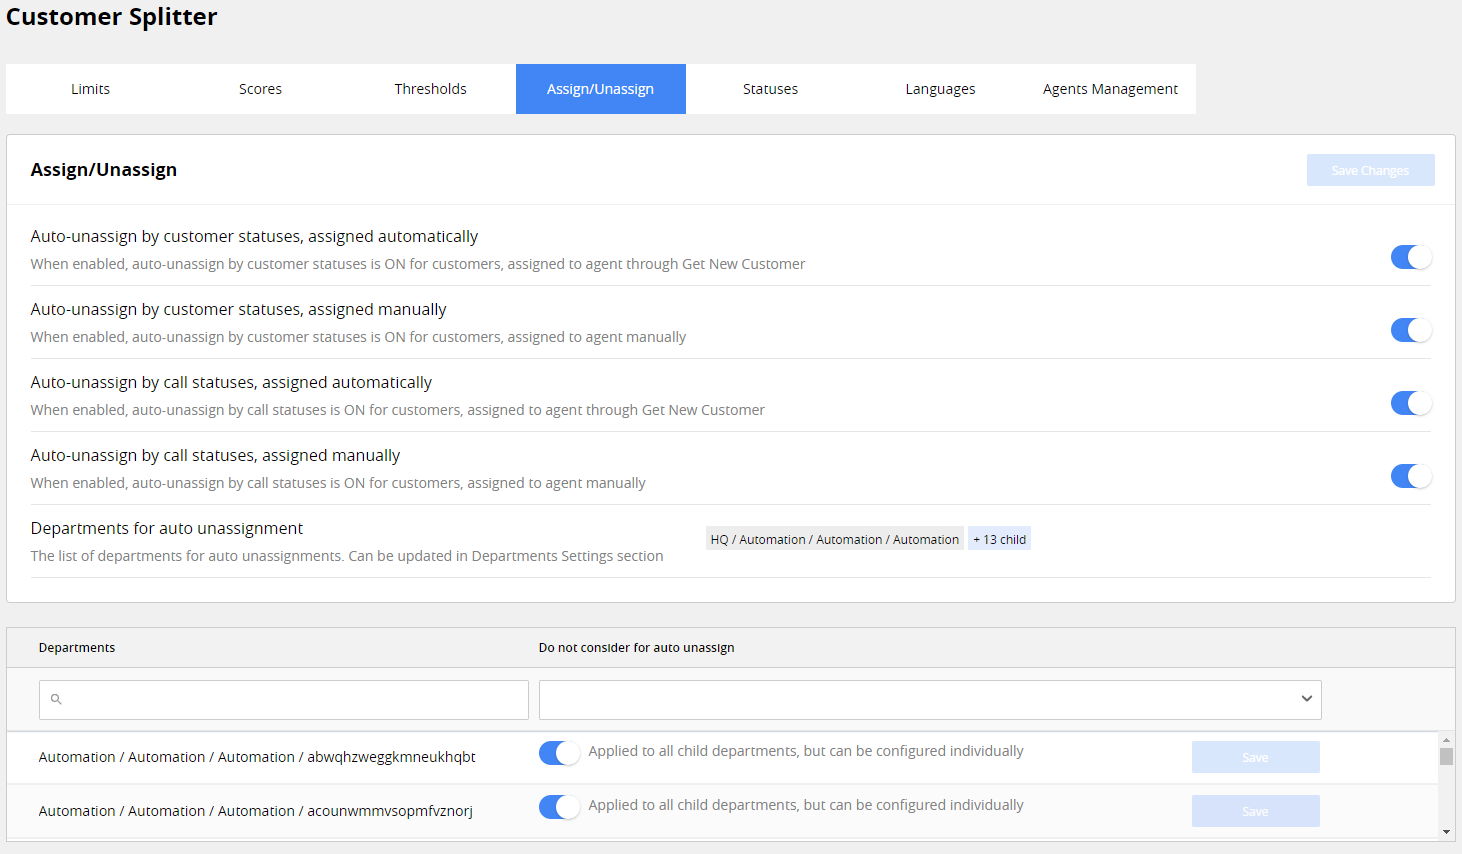
Auto-assignment rules can be applied by:
Call status. In case VoIP dialer automatically assigned “No Answer” status to the first call from agent to customer.
Customer status. in case the agent manually assigned “No Answer 1-5” or “No Answer 5 UP” status to the customer.
Note. Auto-assignment rules work correctly only if your VoIP provider supports it on API level. Please consult with your provider prior to setting them up. In other cases, we can’t guarantee they will work correctly.
They can be switched for the customers, who were assigned to agents with CS functionality (assigned automatically) or the customers, assigned to agents manually by department leads (assigned manually).
Under the unassignment rule toggles**,** you will find the Departments for auto unassignment list with teams for which the auto-unassignment settings described above are active, grouped by desks. You can edit the list below.
You can search the list by typing in search box under the Department column header, and filter it by choosing the options from the drop-down under the Do not consider for auto unassign column header.
To delete the department from Department for auto unassignment list, disable the toggle in the department row. If the department has subdepartments, you can access them by clicking + on the left side of department name, and add or remove them from Department for auto unassignment list individually. Otherwise, their status is the same as the status of their parent department. To apply changes, click the Save button on the right of the department’s row.
Statuses
On this tab, you can set the statuses in which customers cannot be assigned to an agent via CS. Here you also can manage the logic of automatically assigning “do not contact” status to customers if they meet certain conditions. For example, customer doesn’t respond to the agent more than 5 consequent times.

The tab consists of the following elements:
Do not consider for Get Customer field. Here you can select the statuses, customers with which won’t be auto-assigned to agents. To add the status to the list, click on the checkbox on the left of it. Multiple statuses can be added. Click Save Changes button on the top right to update the list.
Automatic update of status from "No Answer 1-5" to "No Answer 5up". Turn the switch on to update customer status after the customer is not answering calls for more than 5 times in a row, or after a certain number of auto-assignments, which you can edit in the field below the switch. Such status is usually included in Do not consider for Get Customer list, to prevent such customers to get repeatedly assigned to agents. Manual assignment of the customer to agent restarts the no answer counter.
Update customer status from "No Answer 1-5" to "No Answer 5up" automatically after number of auto-assignments. In this field, enter the number of automatic assignments, after which customer status will change.
Languages
On this tab, you can set up the agent languages priorities for departments. They will be applied to all the agents within the desk, who don’t have individual language priorities.

The tab settings list has the following columns for each entry:
Department. 4 level structure (Root/Location/Language/Sales Unit) of the agent department. You can edit the list of departments in Departments tab.
Language. The language priorities for the department entry if there are any.
You can search the list by typing in search box under the Department column header, and filter it by choosing the options from the drop-down under the Language column header.
To edit the language priorities for the department, click on the Edit button on the right side in the department’s row.
The Edit Languages window will appear, where you can select the language priorities for the department.
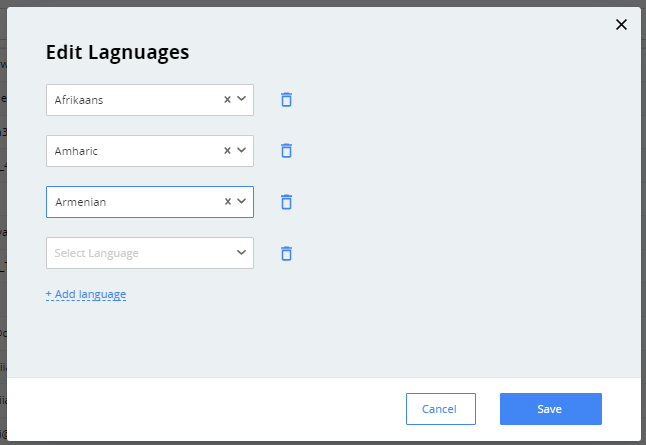
Select languages from the drop-down. To add more languages, click on the Add Language Text below. To delete selected languages, click on the Recycle Bin icon on the right. To save your changes, click the Save button in the bottom right.
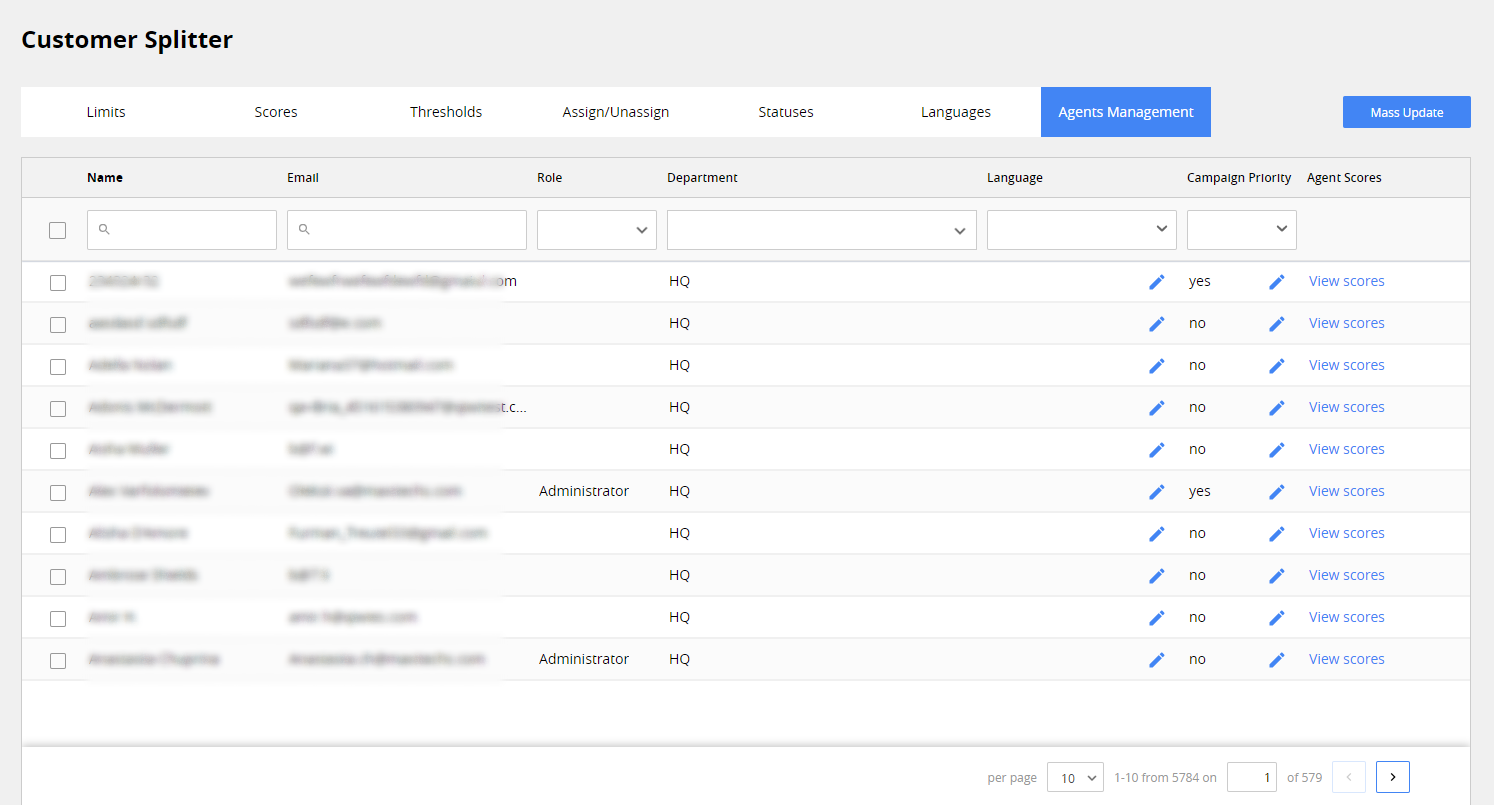
Agents Management
On this tab, users can edit scores, language and campaign priorities for agents.
Permissions. Lead Splitter > Agents Management.
The tab settings list has the following columns for each entry:
Name. Agent name.
Email. Agent mail.
Role. Agent role, if any.
Department. Department the agent works in.
Language. Language priorities for the agent, if any.
Campaign Priority. Campaign priorities for the agent, if any.
Agent Scores. The button to view agent scores.
You can sort and filter the list to narrow it down according to your needs.
To add or edit language priorities for the agent, click on the Edit icon in the agent’s row in the Language column.
Permissions. Lead Splitter > Agents Language Update.
The Edit Languages window will appear, where you can select the language priorities for the agent.
Select languages from the drop-down.
To add more languages, click Add Language link below. To delete selected languages, click the ![]() button on the right. To save your changes, click Save button in the bottom right.
button on the right. To save your changes, click Save button in the bottom right.
Note. Even if customers languages are not in agents language priorities, such customers can be assigned to these agents, if there are no customers with priority languages left to assign.
To add or edit campaign priorities for the agent, click on the Edit icon in the agent’s row in the Campaign Priority column.
Permissions. Lead Splitter > Edit Campaign Priorities.
The Edit Campaign Priority window will appear, with the possibility to select the campaign priorities for the agent.
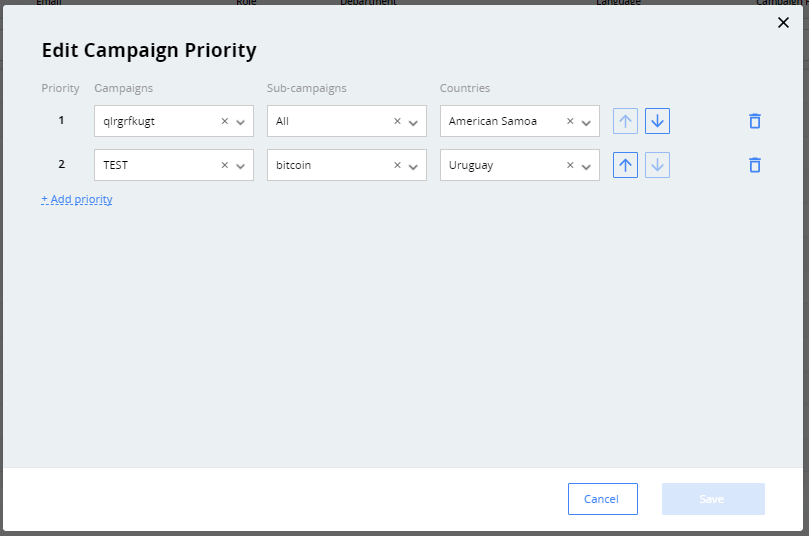
Select campaigns, sub-campaigns and countries from the drop-down.
To add more campaigns, click +Add priority below.
To delete selected languages, click ![]() on the right.
on the right.
To move selected campaigns by the priority order within the list, click on the arrow icons. To save your changes, click the Save button in the bottom right.
Note. Unlike language priorities, as soon as a particular rule is assigned to one agent or more agents, it can NOT be assigned to anyone else within the desk. If you want to have other agents to work with the rule, you need to add the rule to each agent’s campaign priorities.
Agent scores mass update
To mass update agent scores, language and campaign priorities, click on Mass Update button at the top right.

The Mass Update window will appear with the following options to set and update:
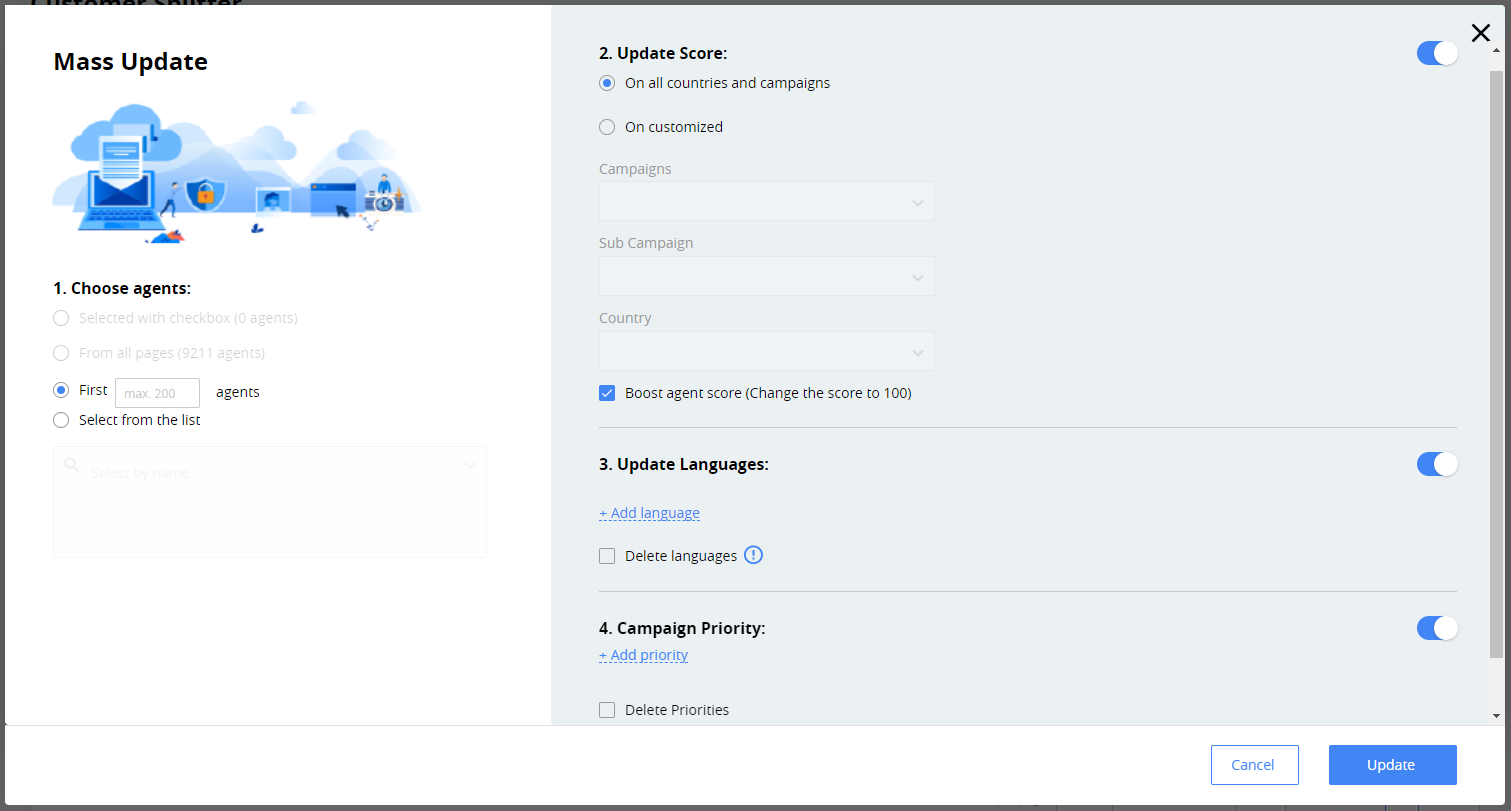
Selected with checkbox. This will apply the updates only to the agents, that were selected on the list before clicking the Mass Update button.
From all pages. This will apply the updates to all agents.
From the first N agents in the list.
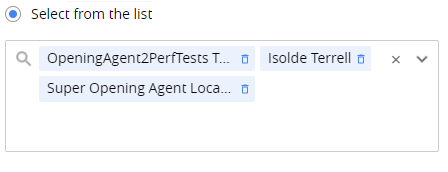
Select from the list. This will apply the updates only to the agents, that were selected in the drop-down, which will appear after selecting this option. You can select both the individual agents and agent groups from the drop-down.
You can select the following agent attributes you want to update in the selection:
Update Score
Permissions. Lead Splitter > Agent Scores update.
Update Language priorities
Permissions. Lead Splitter > Agents Language Update.
Update Campaign priorities
Permissions. Lead Splitter > Edit Campaign Priorities.
To apply the new values to selection, click the Update button on the bottom right.
How Customer Splitter works
After the agent clicks Get New Customer button, the system starts the following sequence of action:
- Agent limit checking. The step checks if the requested customer is within a number of limits set for the Agent. See Agent Limit checking for more details.
- Customer list filtering. The step filters the entire customer list, leaving only the customers whom the agent can potentially contact. See Customer List filtering for more details.
- Agent and Customer Score matching. The step compares agent and customer scores to their respective predefined score thresholds. Complex logic is used. See Agent and Customer score matching for more details. You can omit this step by setting both thresholds to 0.
- Customer list sorting. The step sorts the filtered customer list by a set of priorities. See Customer list sorting for more details.
- Customer to Agent assignment. The step assigns the top customer from the filtered and sorted list to the agent and changes the customer status to reflect that.
Agent limit checking
This step helps to check if the agent is eligible to get a new customer with the help of CS and to avoid uneven distribution of customers among agents. These situations include:
- Agent gets all the customers available for their desk at once by clicking on “Get New Customer” button multiple times in a short time period.
- Agent gets a lot of customers who made the first-time deposit (FTD), giving them an advantage over other agents.
- Agent gets a lot of customers during a month without properly working with each customer. Customers like that are less likely to place a deposit after being reassigned to other agents.
In order to avoid such situations, CS defines the following limits, values of which are defined in the Limits subtab in the Customer Splitter tab.
For the first three of the limits from the list above, agent can’t use CS functionality if at least one of them is exceeded. For the remaining two, agent is still able to get customers without FTD. Agent will be able to get customers with FTD as soon as both limits will not exceed the limit at the moment they click on “Get New Customer” button.
Customers list filtering
After the “Agent limit checking” step, CS retrieves all customer list from the database and filters it according to the criteria mentioned below. The resulting list is narrowed down to all customers that can be a potential deal for the agent. Filtering criteria are:
Customer is not assigned to any agent.
Customer is one of the following types: lead, customer, and depositor.
Customer is assigned to the same desk as the agent.
Customer status is not one of the listed in Do not consider for Get Customer list in Statuses subtab. See Statuses for more info.
Agent and customer score matching
Score matching allows agents with better conversion rates to get customers, who have a higher probability of making a deposit. It is based on assigning an individual score to agent and customer, and comparing them to internal thresholds. Thresholds are separate for agents and customers. Score assigned for customer is global across all the campaigns the customer is in. Agent score is assigned separately for each campaign and country, as agents can score differently across different campaigns.
Threshold values can be set up in Threshold subtab.

Score values are supplied daily by the BI team by default. In other cases, the default Agent Score is assigned, which is also configured.
Charts below are the graphical representation of the most common cases of Agent and Customer Score matching.
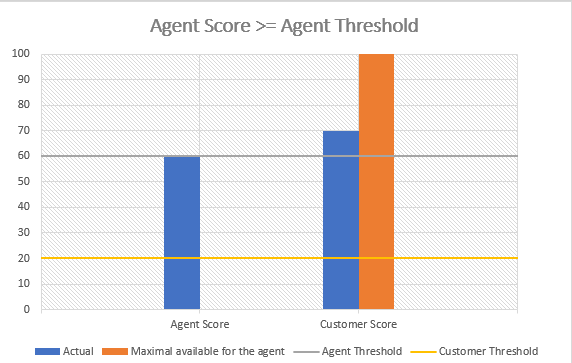
Agent Score >= Agent Score Threshold.
In that case available customers with all customer scores (both below and above Customer Threshold) are available for the Agent.
Agent Score < Agent Score Threshold
Only customers with customer score below customer threshold are available for the Agent.

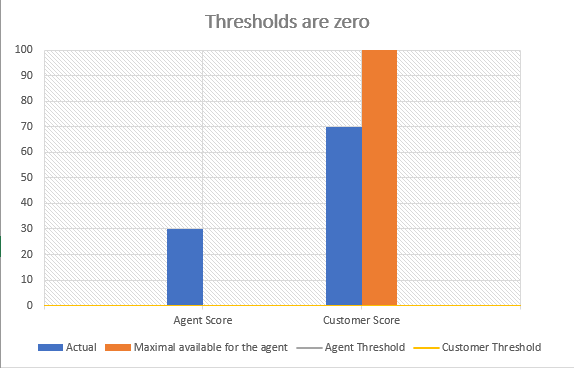
Thresholds are set to zero
In that case all the customers are available for the agent, since every score value of agent is equal to or greater than zero.
Customers list sorting
This step sorts the list after previous steps. The top customer of the list gets assigned to the agent in the next step. Sorting criteria in sequential order are:
- FTD attempt.
Customers who have made a deposit or attempted it, get assigned to agents in the first place.
- Online = True
Customers who are currently on the website.
- Customer Status = New.
Customers who haven’t been contacted before. Customers with other statuses can also be selected, excluding statuses which forbid that, for example “do not contact” – customers, who requested agent to stop contacting them, “no answer 5up” – customers, who didn’t reply to agent calls for more than 5 business days. Customer statuses and restricted customer statuses can be set manually.
- Availability = True
- Boost = Yes
These two customer attributes get positive values for a certain amount of time, when the customer does something from the list below:
Registers
Attempts registration
Makes FTD
Attempts FTD
These attributes are similar, but they differ in duration. Boost lasts 24 hours by default, and Availability lasts for 15 minutes by default. These values can be set manually.
- Language (from priority 1 till N)
If an agent has language priorities set for them (see Languages for more info), CS sorts customers from higher to lower priority. If agent has no settings for language priorities, or there are no customers in the filtered list with prioritized languages, customers with other languages are included in the sorting.
- Created Day (without time)
The list is sorted from newest to oldest.
- Campaign Priorities
If agent has campaign priorities set for them (see Agents Management for more info), CS sorts customers from higher to lower priority. If agent has no settings for campaign priorities, or there are no customers in the filtered list with prioritized campaigns, customers with other campaigns are included in the sorting.
- Scores (from High to Low)
The list is sorted from customers scoring the highest to customers scoring the lowest.